Monthly Archives: June 2020

Solved: Keeping Windows Forms from Resizing when Dragging them to a Monitor with a Different Resolution

Standard disclaimer: This is one of those “how to overcome an incredibly geeky tech problem which has been bedeviling me forever” posts. It’s meant as a virtual breadcrumb for anyone who faces a similar issue. If you find it and it helps, please give it a “like”. If this isn’t the sort of thing that interests you, by all means skip on to the next comic, music, or pop culture-related post.

Anyone who’s ever done Windows Forms coding knows what a pain in the nether regions it’s been to get windows and type to properly handle monitors with different resolutions. (I wrote about it years ago here)

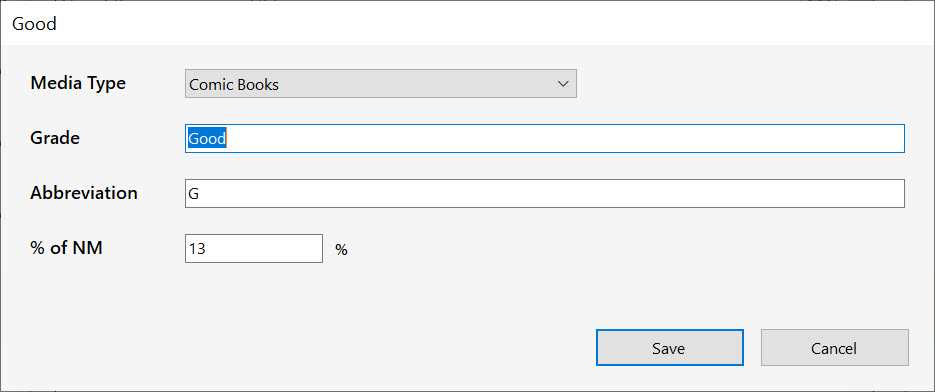
Things got substantially better with the introduction of .Net Framework 4.7.2, which started to make it possible to properly scale things when you had multiple monitors with different resolutions. Still, there were certain actions–such as dragging a screen from a hi-res 4K monitor set to 150% magnification to a regular monitor set at 100%, that would give results like this:

Dialog as it appears on the 4K monitor, set at 150% display scale

…becoming this

Same window, when dragged to a monitor set at 100% display scale

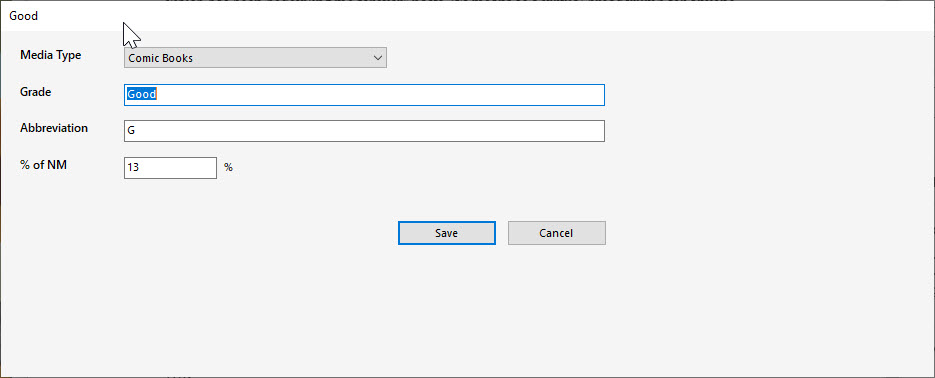
…when dragged to the adjacent 1080p monitor, whose display scaling was set to 100%. Note the sea of white space at the right and bottom. This occurs even when there is no program code to setup the window.

Worse, when dragging the window back to the original monitor, the white space remains–or even grows (in some cases, enough so that repeatedly dragging the window back and forth fills the entire screen).

Granted, it’s possible to manually compute your own window scaling factors, and resize and scale every element as necessary whenever the form was moved, but this is beyond tedious in practice–and it makes dragging forms around both slow and ugly to boot. You also need to test that you’ve handle any screen DPI switches that happen simply when the user switches up their display settings in the control panel–another can of worms.

Setting both monitors to the same scaling factor removes the problem, but that’s also not really a solution.

So what is the solution? It turns out it’s two things: one of which makes sense, the other which appears to be a bug in .Net’s rendering algorithm.

  1. The default setting of any Windows form’s “AutoSizeMode” property is “GrowOnly”. This needs to be overridden on every form to be “GrowAndShrink”.
  2. The culprit behind the growing white space, however, was the anchor property of the bottom buttons(!). One might reasonably assume that since the action buttons are meant to be placed dependent on the position of the lower-right of the window, that anchoring them to the bottom-right of the form makes sense. (This is exactly what you’d do if the window was capable of resizing: you’d always want the buttons to ride at the bottom-right of the form).

The bug apparently comes, however, in that setting the buttons to be anchored to the bottom right of the form messes up .Net’s calculation of how large the form should be when moved between windows of different dpi/scale. .Net seems to effectively scale up the form according to the old dpi setting, peg its boundaries at where the anchored items would be, then re-lay it out according to the new monitor’s dpi–leaving the white space you see there.

The solution? On any fixed size form, avoid anchoring any elements to the bottom or right of the form.

It took a long time to figure out what was going on and fix it. Now I just have to check over about a jillion dialogs and forms in ComicBase, and my next Livestream (which inevitably involves showing something on my secondary monitor which was dragged over from my 4K primary monitor) should go a little smoother…

Things I’m Learning as I Learn to Livestream

I recently decided to start up a ComicBase Livestream, so that I (your friendly neighborhood ComicBase creator) could reach out to the folks directly, and answer your questions live through the magic of internet broadcasting.

In the interest of aiding all who are considering setting up their own broadcast, here’s a few of the bits of technical trivia I’ve learned in the past two weeks as a newbie livestreamer:

  • “AFV” means “Audio Follows Video”. It also means that if you push the little button marked “AFV” on your ATEM Mini Pro switcher, you’ll be activating your video camera’s tinny little built-in microphone any time you switch the shot to the camera. The switcher then adds that audio to the sound from the big condenser microphone you had plugged into the switcher’s separate “Mic” port, giving your a bitchin’, doubled-up boomy sound. If you’re a student of audio engineering, you’ll recognize that this as reminiscent of the trick used to record David Bowie’s “Heroes”… except that it sucks.
  • The ATEM Mini Pro switcher is a fantastic piece of gear–basically giving you a portable TV switching console with the ability to directly livestream right from the switcher. But it lacks a headphone jack, so you’ll never hear the boomy AFV thing until you play back the audio after the livestream.
  • The FocusRite Scarlett 2i2 audio interface I sprung for in order to be able to use a decent condenser microphone for the shoot is also wonderful… but it only has one set of outputs. This means that if you have those going to your speakers so you can hear your computer, you can’t also send the output to your video switcher to take in the sound of the condenser microphone you’re using the Scarlett’s phantom power for. For about a day, I fooled around with various Y-cable scenarios, but eventually gave up and realized I just shoulda bought the more expensive Scarlett 8i6 in the first place. Which I then did. If you need a lightly used 2i2, please reach out: it’s going cheap.
  • If you want the big AT-4033 condenser microphone you’ve suspended on a boom stand to not slowly drop from the top of the frame into the center of your desk while shooting, there’s a trick. It is not, as it turns out, to wrench the tightening knob on your boom as hard as you possibly can (won’t work, strips the mechanism), but instead to suspend a small sandbag counterweight on the far end of the boom. Physics: the ultimate Lifehack!
  • My wonderful (and expensive!) Canon 5d Mark III camera will apparently auto-stop recording at 29 minutes, 59 seconds (a “feature” built into most DSLR cameras designed to avoid being classed as a “video camera” for EU taxation purposes). This is less than great if you suspect you might want to talk for 30 minutes or more.
  • On the other hand, the more-than-a-decade-old Canon HF-100 handycam I scrounged from my back closet works beautifully for shooting the video. But it also has an uncanny ability to auto-focus on the boom microphone I intentionally left in the shot, leading the focus on my face to be a little soft. This is flattering for hiding my increasing number of wrinkles, but is not a standard cinematographic artistic choice.
  • The reason almost every YouTube livestreamer except the truly professional begins their streams by staring blankly at the camera is that they’re watching YouTube’s preview window to see if it’s actually picking up their video feed before they click the “Go Live” button to start broadcasting the stream. After clicking that button, YouTube then apparently randomizes the starting frame by +/- 3 seconds in order to capture that uncomfortable staring look you had going as you waited for the video to appear in preview.
  • Live chat is amazing–but it scrolls by really quickly, and it’s nigh-impossible to catch anything but a tiny amount of the discussion until after the stream is over.
  • Despite all this, Livestreaming is a blast! I’ll be continuing to do it each Wednesday at 4pm Central, no doubt making new and creative mistakes each broadcast–and having a great time answering viewer questions, talking about new and obscure ComicBase features, and what have you. Please check out the channel here, and do the old “Like and Subscribe” thing to help spread the word, and get notified of new broadcasts!